Push-ups are excellent for strengthening and conditioning the shoulders, torso, and biceps. Women may believe that push-ups are for men because women have less upper body strength than men. Effective push up techniques for women however, that’s not accurate! Push-ups are really for everyone and will make your complete body stronger! With just the proper practice and attitude, women can perform push-ups just as effortlessly as males.
Push-ups can also support the abdomen and the muscles of the mid and lower back. They are excellent for improving your posture and strengthening your core with no need for apparatus, as you maintain a planki position for the entire exercise. You can start with the simpler versions and progressively move on to advanced levels of push-ups. In addition, conducting them in the correct form by learning the appropriate technique is essential to obtaining optimal benefits and reducing the risk of injuries.
5 Best Effective Push Up Techniques For Women
Warm up your upper body, core, and legs for 10 minutes before you begin so you can perform push ups accurately and without risk of injury. Incorporate planks and tightening your shoulder blades together. Get set to commence with the simpler push-ups before proceeding.
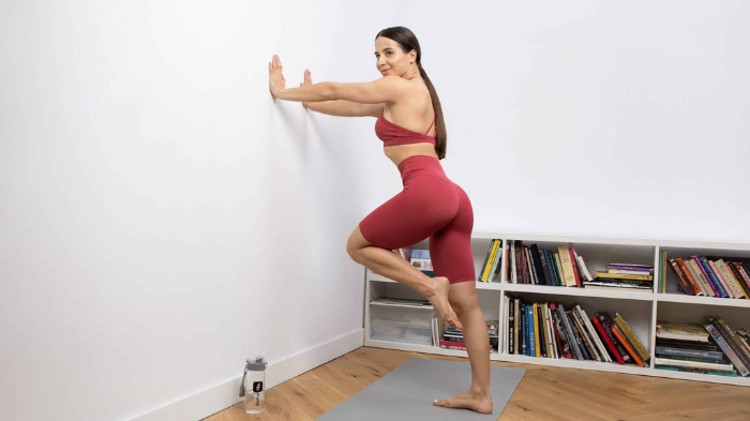
1. Wall Push-Ups

Benefits
Wall push-ups work on the chest (pectoral muscles), shoulders, arms, and abdominal muscles without excessive weight on your upper body. They are excellent as you’re first learning and help you learn the appropriate movements of your shoulder blades in a push-up. They help develop, strengthen, and tone your pectoral muscles and can give your breasts a lift naturally. They prepare them for regular push-ups and other advanced variants.These are simplest since you are standing and therefore have the least weight on the wrists.
Steps
- Stand facing a wall your arm-length distant. Keep your feet hip-width apart, legs erect, and knees relaxed.
- Place your palms on the wall at chest level with hands slightly wider than shoulder-width apart. Keep your neck erect and gaze at the wall. Engage your core and glutesi so your body is in a straight diagonal line. This is the beginning position.
- Exhale and bend your forearms to 45 degrees towards the wall. Make sure you do not stoop from the pelvis. Squeeze your shoulder blades together and bend your forearms to 45 degrees, not out to the sides. Your cranium, spine, buttocks, and legs should be in a straight line. Do not lower your head or raise your shoulders.
- Stop when you are a few inches away from the wall.
- Pause and propel your body back to the starting position by separating your shoulder blades. Inhale.
- Do 3 sets of 5 reps. Move on to 8 or 12 reps as you become comfortable.
Read also: Stationary Bike Can Improve Your Health
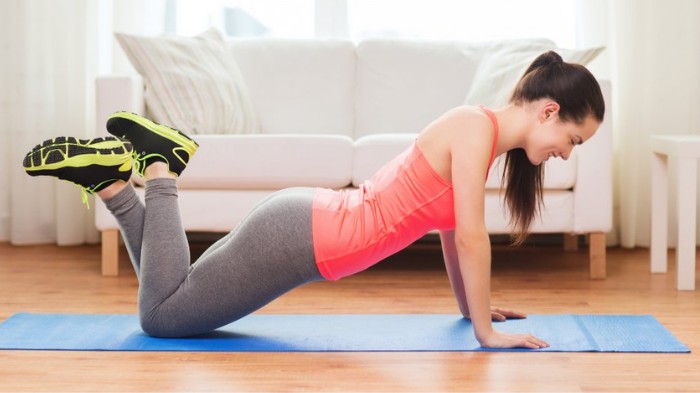
2. Knee Push-Ups

Benefits
Knee push-ups are excellent for novices. They operate on the torso (pectorals), shoulders (deltoidsi ), and arms (biceps). With knee push-ups, you will learn to engage your core and maintain correct form – and this is crucial for moving on to advanced push-ups.
Steps
- Come to hands and knees on an anti-slip mat, knees under hips, hands a little wider than shoulder-width apart, palms level on the floor, and gaze a few feet in front of you (do not lower your head)
- wedge your toes on the ground so you’re on the soles of your feet, wedge in your midsection to keep your core taut, engage your buttocks, and maintain your head, neck, and vertebrae in a straight line. This is the beginning position.
- Exhale and lower your sternum towards the floor. Bend your elbows back to 45 degrees by compressing your shoulder blades together; your elbows should not point straight out to the sides. Do not let your shoulders sink down.
- Pause for a moment, and lift your body up to the starting position by straightening your arms and separating your shoulder blades. Inhale.
- Repeat the steps again.
- Do 3 sets of 5 reps. Move on to 3 sets of 8 as you become more accustomed with the technique.
3. Incline Push-Ups

Benefits
This is a slightly difficult push-up variant compared to knee and wall push-ups. Incline push-ups are conducted with the palms positioned higher than the ankles. It helps strengthen the upper body’s muscular strength, increases flexibility, and prepares you for a complete plank on your hands. It also tones and strengthens the chest, shoulders, arms, and abdomen. To do an incline push-up, you can use a bench at the gym or a settee, a table, a robust chair, etc.
Steps
- Place your palms level on a bench or elevated surface, hands slightly broader than shoulder-width. Keep your neck erect and gaze at the bench. Extend your legs backward and keep your feet close together.
- Tuck in your stomach, engage your buttocks, and maintain your head, neck, back, pelvis, and thighs in a straight line. This is the beginning position.
- Exhale and bend your forearms back to 45 degrees by tightening your shoulder blades; your elbows should not point straight out to the sides.
- Stop when you sense your shoulders start to elevate. Do not lower your pelvis down or bend your back. Keep your shoulders down. Pause for a moment and propel your body back to the starting position by separating your shoulder blades. Inhale.
- Do 3 sets of 5 reps before moving on to 8 and 12 reps per set.
Read Also: Barre Exercises for Beginners
4. Regular Push-Ups

Benefits
Regular or basic or standard push-ups are an effective upper body strengthening and endurance exercise that engages the core, shoulders, chest, biceps, and triceps. Regular push-ups are harsher than the knee, wall, and incline push-ups because much more weight is on your wrists. But regular push-ups get simpler with practice, so be consistent!
Steps
- Start in a full plank position – palms under shoulders, legs straight back in line with hips,abs in, shoulders down, hips up in line with shoulders so your body is in a straight line.
- Exhale and bend your forearms back to 45 degrees by tightening your shoulder blades; your elbows should not point straight out to the sides.
- Stop when you sense your shoulders start to elevate. Do not lower your pelvis down or bend your back. Keep your shoulders down relaxing.
- Pause for a moment and propel your body back to the starting position by separating your shoulder blades. Inhale.
- Do 3 sets of 5 reps before moving on to 8 or 12 reps.
5. Decline Push-Ups

Benefits
Decline push-ups require you to maintain your legs on a higher plane and palms on the floor. This exercises the shoulders more than conventional push-ups while challenging the core, buttocks, chest, biceps, and triceps. You can use a bench, a crate, or any piece of furniture to do this push-up.
Steps
- Sit on your knees facing away from the bench, crate, or the furniture you are going to use for this exercise.
- Place your palms level on the floor, hands slightly broader than shoulder-width. Roll your shoulders back.
- Place your feet on the bench one by one, legs hip-width apart. Tuck in your midriff and engage your glutes. Keep your head, spine, pelvis, and legs in a straight line. Look at the floor but do not pull in your neck. This is the beginning position.
- Exhale and bend your forearms back to 45 degrees by tightening your shoulder blades; your elbows should not point straight out to the sides.
- Stop when you sense your shoulders start to elevate. Do not lower your pelvis down or bend your back. Keep your shoulders down relaxing.
- Pause for a moment and propel your body back to the starting position by separating your shoulder blades. Inhale.
- Do 3 sets of 5 reps before moving on to 8 or 12 reps.
Read also: Health Benefits of Kapalbhati Pranayama
conclusoin on Effective Push Up Techniques For Women
For women who want to improve their upper body, tone their core, and increase their general level of fitness, learning how to do push-ups well may alter their life. You may get excellent results without getting hurt if you concentrate on form and work your way up from modified to regular push-ups. Keep in mind that consistency is key. Integrate push-ups on a regular basis and acknowledge your successes as you go! Push-ups may become a successful workout technique that gives you power and trust if you are patient and persistent.
FAQ's: Effective Push Up Techniques For Women
How can I improve my push-up position?
- Start from the Bottom.
- Drop to Your Knees and Modify.
- Place Your Hands Slightly Wider Than Shoulder-Width Apart.
- Don't Stick Your Butt in the Air.
- Keep Hips from Sagging Toward the Ground.
- Don't Drop the Head When Lowering Body Down.
- Focus on Quality, Not Quantity.
- Slowly Incorporate Variations.
What is the best body position for push-ups?
Maintain a flat back and fix your gaze on the three feet in front of you. Lower your body till your chest touches the floor while keeping your neck neutral. Throughout the action, keep your body in a straight line from head to toe and avoid dipping or protruding your butt.
What are the safest push-ups for shoulders?
Because they demand a lot less internal and external shoulder movement than a regular push-up, neutral grip push-ups are the greatest shoulder-friendly push-up.
What is the best form for push-ups?
Your spine should be neutral and in a straight line. Stop with your chest just above the floor and bend your elbows to lower yourself to the floor. A 45-degree angle between your elbows and torso is ideal. With your elbows fully extended, press yourself back up off the floor and raise yourself to the top position.